Getting started
This book contains guides, helping to get started with the Rust Trust Spanning Protocol (TSP) implementation.
See https://trustoverip.github.io/tswg-tsp-specification/ for the TSP Specification.
Quick start
See the web interface to get started with TSP without installing any software. The web interface is intended to showcase the direct communication mode of TSP, the CESR encoding of messages and for testing purposes.
CLI
See the command line interface guide to get started with the test CLI for TSP. The TSP CLI is an examplke application of Rust TSP that helps testing the direct, nested and routed mode of TSP. There is some support infrastructure deployed on tsp-test.org in order to get started quickly.
Web interface
A short demo of the web interface:
Overview
Go to https://tsp-test.org/
This interface allows us to create VIDs and send and receive messages.
The VID type used for this demo is did:web. When a new identity
is created, the corresponding did.json document is published on the same
domain (tsp-test.org).
The transport used for this demo is HTTPS and web sockets (WSS). The server (tsp-test.org) also acts as a transport backbone.
Getting started
Create an identity
To get started, create an identity:
- In the top left corner enter an username, e.g.
alice - Press "Create test VID"
In the list of identities on the left your VID with the corresponding key material wil be shown. This identity will also be stored in the local storage of your browser. The next time you visit this page it will be loaded automatically.
Resolve and verify a VID
To resolve a vid follow the instructions below.
Note that only VIDs of the type did:web or did:peer are supported.
In order to be able to resolve a VID you could open the web interface in an "Incognito" browser window and create a new VID. You should use "Incognito" to prevent the identities in your local storage to be overwritten. This way you can have a window for a sender and a window for a receiver identity en test sending messages from one to the other.
Note that this will also work over the internet, sending messages from one device to the other.
Enter a full VID in the field "Resolve and verify VID" and push the button.
For example did:web:tsp-test.org:user:bob.
The resolved and verified VID wil be displayed in the identities column.
Sending / receiving messages
Use the "Send message" for to send messages. The "Sender" and "Receiver" fields must be filled in with fully qualified VIDs, that exist in the "Identities" column.
For example, we could fill in did:web:tsp-test.org:user:alice as sender and
did:web:tsp-test.org:user:bob as receiver if we have the private VID for
did:web:tsp-test.org:user:alice and the Public VID for did:web:tsp-test.org:user:bob.
The contents in the "Non-confidential data" will be added to the TSP unencrypted. The contents of the field "Message" will always be encrypted.
A browser window with the private VID of the receiver will show all messages addressed to this VID in the "Received" column.
Select sender / receiver
Instead of entering the full VID in the "Sender" / "Receiver" fields, you can also use the "Select sender" and "Select receiver" buttons in the "Identities" column.
Ad-hoc verification
If a message is received from an unknown sender the button "Verify" can be pressed to resolve and verify the sender VID and decrypt / verify the message contents.
Message debug print
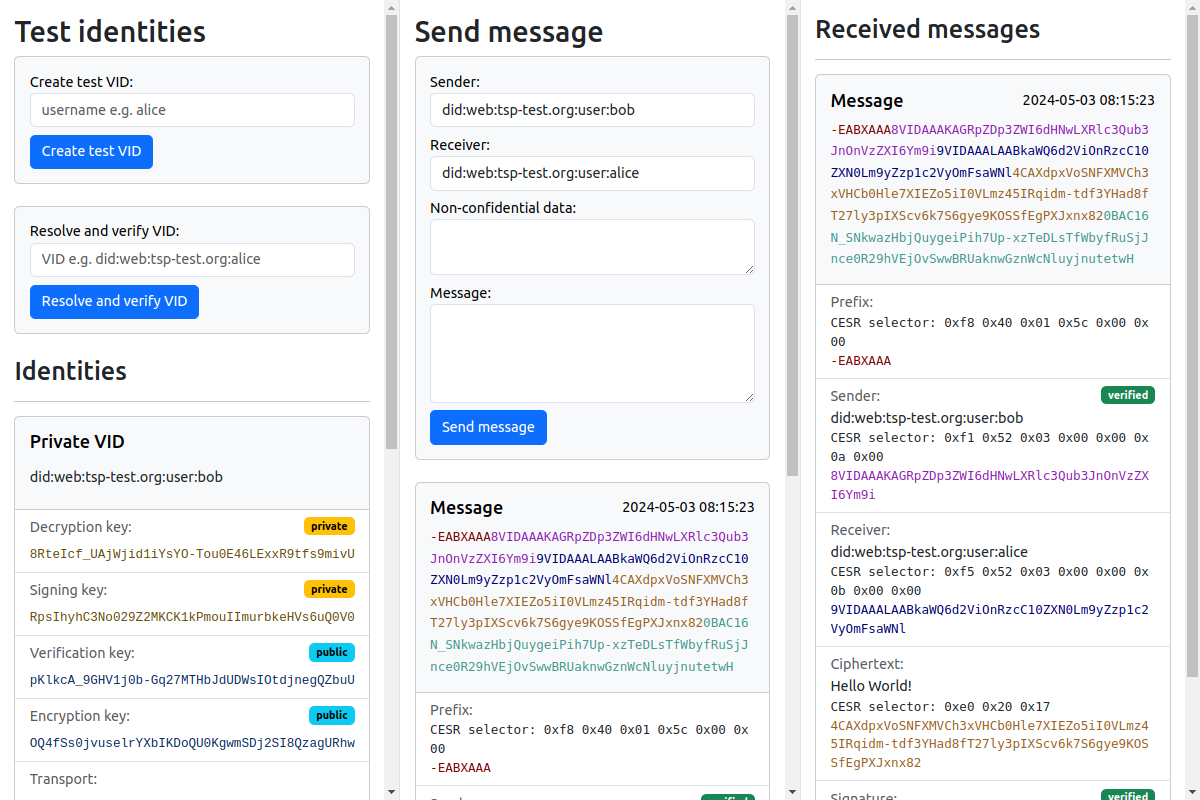
Each message is shown in the CESR text domain. The individual parts, the selectors and possibly the plaintext variants of these parts are shown below.
TSP Command Line Interface
The command line interface is an example application of the Rust TSP implementation. It helps testing and exploring TSP, the cryptography, transports, modes and message encoding.
Read the next sections on how to get started.
A short demo of the CLI (made using the TSP SDK development version of May 2024):
Installation
To get started with the CLI, first install Rust. See https://www.rust-lang.org/tools/install. The fastest way is running the following command in your terminal:
curl --proto '=https' --tlsv1.2 -sSf https://sh.rustup.rs | sh
After Rust is installed you should be able to run cargo:
cargo version
Output:
cargo 1.77.1 (e52e36006 2024-03-26) for example
Installing the TSP CLI program:
cargo install --git https://github.com/openwallet-foundation-labs/tsp.git examples --bin tsp
You should be able to run tsp:
tsp
Output:
Send and receive TSP messages

Usage: tsp [OPTIONS] <COMMAND>

Commands:
  verify
  create
  send
  receive
  help     Print this message or the help of the given subcommand(s)

Options:
  -d, --database <DATABASE>  Database file path [default: database.json]
  -v, --verbose
  -p, --pretty-print         Pretty print CESR messages
  -h, --help                 Print help
Usage
Create a first identity
The tsp command line tool will store its state using the Aries-Askar interface
in a SQLite file in the current directory.
To create a test did:web identity run the following command:
tsp create example
Output:
INFO tsp: created new database
INFO tsp: created identity did:web:tsp-test.org:user:example
We can add an alias to a VID using the --alias argument:
tsp create example --alias example
In subsequent commands we can type example instead of did:web:tsp-test.org:user:example.
Every tsp subcommand also supports the --verbose or -v flag for a more
verbose output:
tsp --verbose create example
Output:
TRACE tsp: opened database database.sqlite
 INFO tsp: added alias example -> did:web:tsp-test.org:user:example
 INFO tsp: created identity did:web:tsp-test.org:user:example
TRACE tsp: published DID document to https://tsp-test.org/user/example/did.json
TRACE tsp: persisted database to database.sqlite
Resolve a VID
VIDs created with the tsp tool are published on tsp-test.org.
Currently Rust TSP is able to verify did:web and did:peer VIDs
To resolve and verify a VID, run the following:
tsp verify did:web:tsp-test.org:user:example
Output:
INFO tsp: did:web:tsp-test.org:user:example is verified and added to the database
The verify command also support the alias argument:
tsp verify did:web:tsp-test.org:user:example --alias example
Send a message
For this example we will create two databases and identities - alice and bob.
You could perform the operations for alice and bob on different computers, for this example we will seperate them by using distinct databases.
Use the --database flag to specify the file name of the database.
First create the identity for alice:
tsp --database alice create alice --alias alice
Then create the identity for bob:
tsp --database bob create bob --alias bob
Let alice verify bob's VID and add it to the database alice:
tsp --database alice verify did:web:tsp-test.org:user:bob --alias bob
Let bob verify alice's VID and add it to the database bob:
tsp --database bob verify did:web:tsp-test.org:user:alice --alias alice
Let bob start listening for a message:
tsp --database bob receive --one bob
The --one argument makes the command exit when the first message is received.
Since the above command will block / wait for a first message we should use a new / different terminal to send the message from alice.
To send a message run the following:
echo "Hello Bob!" | tsp --database alice send --sender-vid alice --receiver-vid bob
Note that alice and bob are aliases of did:web:tsp-test.org:user:alice
and did:web:tsp-test.org:user:bob.
We can also use aliases for the argument, for example:
echo "Hello Bob!" | tsp -d alice send -s alice -r bob
In the other terminal window the message should appear:
tsp --database bob receive --one bob
 INFO tsp: listening for messages...
 INFO tsp: received message (11 bytes) from did:web:tsp-test.org:user:alice
Hello Bob!
DID types supported
The TSP CLI example application supports two types of decentralized identifiers:
did:web, created usingtsp create. These are resolved by finding a.jsonfile on a server and checking its contents.did:peer, created usingtsp create-peer. These are essentially self-signed identifiers.
The TSP CLI can use two types of transport:
-
https, which forces the use of a broadcast server application (seedemo-server.rs), but will work well across firewalls. -
tcp, which requires a direct network connection between two instances of the TSP CLI. In practice you can use this only on a local network (or the same machine, if you use different ports), but this functionality is added to demonstrate the flexibility of having multiple transports. This transport mode is only available todid:peer. To use TCP transport, use the--tcp address:portflag totcp create-peer.
Pretty print messages
The send command supports the --pretty-print argument.
This wil output the CESR-encoded TSP mesage that is sent.
Continuing with the alice and bob example:
echo "Hello Bob!" | tsp --pretty-print -d alicen send -s alice -r bob
Output:
 INFO tsp::async_store: sending message to https://tsp-test.org/user/bob
CESR-encoded message:
-EABXAAA9VIDAAALAAAZGlkOndlYjp0c3AtdGVzdC5vcmc6dXNlcjphbGljZQ8VIDAAAKAAZGlkOndlYjp0c3AtdGVzdC5vcmc6dXNlcjpib2I4CAX7ngr3YHl2z91L-anFBYxbQhM48CT_wqrCCRNdsN5fm-oshqvwqnKDK5rLkn_kvVI8aWZ7SEhiaiB8N6e-bjInrBbhNII0BAceo-mZoSvG3MY_UEqrgzP4kpeLJJK9MdQx53c4nxKh6_jvB2DuXJ6TBNjj-lXszyTH8yDAMSioDRluucSBpPAg
 INFO tsp: sent message (11 bytes) from did:web:tsp-test.org:user:alice to did:web:tsp-test.org:user:bob
In a terminal window supporting colors this will look like the following:
-EABXAAA9VIDAAALAAAZGlkOndlYjp0c3AtdGVzdC5vcmc6dXNlcjphbGljZQ8VIDAAAKAAZGlkOndlYjp0c3AtdGVzdC5vcmc6dXNlcjpib2I4CAX5I7ozAGaFVqTxz8PJve0Tscor80fvds6hCf3yDUtOnHpXZ84uXFGXM-PcfLDWsRWvH7SoOG4UwQU8H-zEfBFs0skhjtk0BAtrMgdWXM9Mfdgiq2awx6VAWCUUYCfjv1tdQqnjNc4eB-IOdBVA459uAFX2EGfdWWGp2OxxwbAutneudE9zYUBg
The first red part is the TSP prefix. The purple part is the sender VID, the blue part the receiver VID, the yellow is the ciphertext and the cyan part is the signature.
The bold characters note the CESR selector of the part.
Nested mode
To try out TSP in nested mode, the command line interface can be used. A nested relationship can be set up by exchanging relationship messages (the preferred way), but it can also be tested by manually setting up identifiers, having both sides explicitly verify each others identities and establishing a relationship between those identifiers.
Nested mode (using relationship control messages)
Establishing an outer relationship
To send a nested TSP message both sender and and receiver should first establish a direct relationship. This can be initiated by one party verifying the VID of the other, and sending a relationship request.
We use the same alice and bob example as in the previous chapter.
First, alice will have to learn about bob's existence:
> tsp -d alice verify bob did:web:tsp-test.org:user:bob
 INFO tsp: did:web:tsp-test.org:user:bob is verified and added to the database alice
Then she can send a relationship request message. This requires bob to be listening as
shown in the previous chapter (i.e. running tsp -d bob receive in a separate window):
> tsp -d alice request --sender-vid did:web:tsp-test.org:user:alice --receiver-vid did:web:tsp-test.org:user:bob
 INFO tsp::async_store: sending message to https://tsp-test.org/user/bob
 INFO tsp: sent control message from did:web:tsp-test.org:user:alice to did:web:tsp-test.org:user:bob
On bob's side, we will see:
> tsp -d bob receive --one
 INFO tsp: message involving unknown party did:web:tsp-test.org:user:alice
do you want to read a message from 'did:web:tsp-test.org:user:alice'? [y/n] y
 INFO tsp: received relationship request from did:web:tsp-test.org:user:alice, thread-id 'JZla6+N6FP/In7ywOp8yQD2GfXemCn1e4b6tFVWaLxg'
Notice how a thread-id was generated, we need this to confirm the relationship. This can be done by sending a relationship acceptance message (this requires alice to be listening):
> tsp -d bob accept --sender-vid did:web:tsp-test.org:user:bob --receiver-vid did:web:tsp-test.org:user:alice --thread-id 'JZla6+N6FP/In7ywOp8yQD2GfXemCn1e4b6tFVWaLxg'
On alice's side, this will look like:
> tsp -d alice receive --one did:web:tsp-test.org:user:alice
 INFO tsp: received accept relationship from did:web:tsp-test.org:user:bob
alice and bob now have a bidirectional relationship.
Nesting the relationship
To establish the nested relationship follows the same procedure as above, except that the request and accept subcommands will
have to be passed the --nested parameter.
Let's say that alice again takes the initiative to nest the relationship, which starts the same as before:
> tsp -d alice request --nested --sender-vid did:web:tsp-test.org:user:alice --receiver-vid did:web:tsp-test.org:user:bob
 INFO tsp: sent a nested relationship request to did:web:tsp-test.org:user:bob with new identity 'did:peer:2.Vz6Mv3HRDr8nQ28LZxXHrU1zaUdXVJVjQzhuVcFB4pyF5rweQ.Ez6Lc6URPHMVN1vswnk32ND5zNcAb5o2QA1Hs4NThH2YzAuVL.SeyJzIjp7InVyaSI6InRzcDovLyJ9LCJ0IjoidHNwIn0'
Notice that a new did:peer identifier was created. This will have a transport set to tsp://. Let's create an alias for it:
On bob's side, this message will appear:
> tsp -d bob receive --one
 INFO tsp: received nested relationship request from 'did:peer:2.Vz6Mv3HRDr8nQ28LZxXHrU1zaUdXVJVjQzhuVcFB4pyF5rweQ.Ez6Lc6URPHMVN1vswnk32ND5zNcAb5o2QA1Hs4NThH2YzAuVL.SeyJzIjp7InVyaSI6InRzcDovLyJ9LCJ0IjoidHNwIn0' (new identity for did:web:tsp-test.org:user:alice), thread-id 'cR9RznAELgbp9XZ+VFFjq7vYv4v+ITaGrxa7L2ddCPw'
As before, bob can accept this using tsp accept:
> tsp -d bob accept --nested --sender-vid did:web:tsp-test.org:user:bob --receiver-vid did:peer:2.Vz6Mv3HRDr8nQ28LZxXHrU1zaUdXVJVjQzhuVcFB4pyF5rweQ.Ez6Lc6URPHMVN1vswnk32ND5zNcAb5o2QA1Hs4NThH2YzAuVL.SeyJzIjp7InVyaSI6InRzcDovLyJ9LCJ0IjoidHNwIn0
 INFO tsp: formed a nested relationship with did:peer:2.Vz6Mv3HRDr8nQ28LZxXHrU1zaUdXVJVjQzhuVcFB4pyF5rweQ.Ez6Lc6URPHMVN1vswnk32ND5zNcAb5o2QA1Hs4NThH2YzAuVL.SeyJzIjp7InVyaSI6InRzcDovLyJ9LCJ0IjoidHNwIn0 with new identity 'did:peer:2.Vz6MuvAXTdNjiSV4DkbMUXAzShqiL2wvFNf2Dg4mr34JkQqk6.Ez6LbyVXwzoVNbRVm7X1Bpa4BqM5Aa5QYXyT4j6iRCxJAo4Fc.SeyJzIjp7InVyaSI6InRzcDovLyJ9LCJ0IjoidHNwIn0'
Instead of the did:peer, bob could also have used alice's outer VID here. The TSP SDK will know which VID to use. Notice
how a new VID was also generated for bob. On alice's side, this will look as follows:
> tsp -d alice receive --one
 INFO tsp: received accept nested relationship from 'did:peer:2.Vz6MuvAXTdNjiSV4DkbMUXAzShqiL2wvFNf2Dg4mr34JkQqk6.Ez6LbyVXwzoVNbRVm7X1Bpa4BqM5Aa5QYXyT4j6iRCxJAo4Fc.SeyJzIjp7InVyaSI6InRzcDovLyJ9LCJ0IjoidHNwIn0' (new identity for did:web:tsp-test.org:user:bob)
Note that to make operation easier, we recommend using the alias mechanism to create better names for these essentially random inner identifiers:
> tsp -d alice set-alias inner_alice did:peer:2.Vz6Mv3HRDr8nQ28LZxXHrU1zaUdXVJVjQzhuVcFB4pyF5rweQ.Ez6Lc6URPHMVN1vswnk32ND5zNcAb5o2QA1Hs4NThH2YzAuVL.SeyJzIjp7InVyaSI6InRzcDovLyJ9LCJ0IjoidHNwIn0
> tsp -d alice set-alias inner_bob did:peer:2.Vz6MuvAXTdNjiSV4DkbMUXAzShqiL2wvFNf2Dg4mr34JkQqk6.Ez6LbyVXwzoVNbRVm7X1Bpa4BqM5Aa5QYXyT4j6iRCxJAo4Fc.SeyJzIjp7InVyaSI6InRzcDovLyJ9LCJ0IjoidHNwIn0
And similarly for bob. Using these aliases, nested messages can simply be sent as for any other VID:
echo "Hello Bob" | tsp -d alice send --sender-vid inner_alice --receiver-vid inner_bob
Nested mode (manual setup)
To send a nested TSP message both sender and and receiver should establish a pair of VIDs. One VID is used for the inner message and one for the outer.
We use the same alice and bob example as in the previous chapter.
First, we create an inner or nested VID for alice:
tsp -d alice create-peer alice-inner
Output:
 INFO tsp: created peer identity did:peer:2.Vz6Mv1MHPrewz2y6ntLZwbWdMc2C3Ny6Tk
 hA8mQouGsvNEgDK.Ez6Lbs5PeCs6VCbCjnPFV412nS3SDqjnHYB8sLB69XFQwUUkF.SeyJzIjp7In
 VyaSI6Imh0dHBzOi8vdHNwLXRlc3Qub3JnL3VzZXIvYWxpY2UtaW5uZXIifSwidCI6InRzcCJ9
The create-peer command creates a new identity and key material in the did:peer format.
Next we configure the newly created did:peer as a child of our main identity:
tsp -d alice set-parent alice-inner alice
Output:
 INFO tsp: did:peer:2.Vz6MutdCU73wbCRc4Uypzg1a3gU5vAfwsLjHWbgArHzjqWzpw.Ez6Lbwx
 U56UYuE9EwTPgVJFX2nB3UcssbLk7nnrEF8qQNEZQv.SeyJzIjp7InVyaSI6Imh0dHBzOi8vdHNwLX
 Rlc3Qub3JnL3VzZXIvYWxpY2UtaW5uZXIifSwidCI6InRzcCJ9
 is now a child of did:web:tsp-test.org:user:alice
We do the same for bob:
tsp -d bob create-peer bob-inner
Output:
 INFO tsp: created peer identity did:peer:2.Vz6Mv49Sf4ui8iG5C7VTjMS2bXq7EZDhyK
 SDNbcQhcvUmGLLW.Ez6Lc2RywGrd9ARMmfLBGL3QFsoijt1PmYMMFrPRk6QMfwTEr.SeyJzIjp7In
 VyaSI6Imh0dHBzOi8vdHNwLXRlc3Qub3JnL3VzZXIvYm9iLWlubmVyIn0sInQiOiJ0c3AifQ
tsp -d bob set-parent bob-inner bob
Output:
 INFO tsp: did:peer:2.Vz6Mv49Sf4ui8iG5C7VTjMS2bXq7EZDhyKSDNbcQhcvUmGLLW.Ez6Lc2R
 ywGrd9ARMmfLBGL3QFsoijt1PmYMMFrPRk6QMfwTEr.SeyJzIjp7InVyaSI6Imh0dHBzOi8vdHNwLX
 Rlc3Qub3JnL3VzZXIvYm9iLWlubmVyIn0sInQiOiJ0c3AifQ
 is now a child of did:web:tsp-test.org:user:bob
Next we resolve and verify bob's inner VID. We use the print command to print
the full VID and use xargs to feed the output as input for the verify command:
tsp -d bob print bob-inner | xargs tsp -d alice verify --alias bob-inner
Output:
 INFO tsp: did:peer:2.Vz6Mv49Sf4ui8iG5C7VTjMS2bXq7EZDhyKSDNbcQhcvUmGLLW.Ez6Lc2
 RywGrd9ARMmfLBGL3QFsoijt1PmYMMFrPRk6QMfwTEr.SeyJzIjp7InVyaSI6Imh0dHBzOi8vdHNw
 LXRlc3Qub3JnL3VzZXIvYm9iLWlubmVyIn0sInQiOiJ0c3AifQ
 is verified and added to the database alice
We do the same for the inner VID of alice:
tsp -d alice print alice-inner | xargs tsp -d bob verify --alias alice-inner
Output:
 INFO tsp: did:peer:2.Vz6MutdCU73wbCRc4Uypzg1a3gU5vAfwsLjHWbgArHzjqWzpw.Ez6Lbw
 xU56UYuE9EwTPgVJFX2nB3UcssbLk7nnrEF8qQNEZQv.SeyJzIjp7InVyaSI6Imh0dHBzOi8vdHNw
 LXRlc3Qub3JnL3VzZXIvYWxpY2UtaW5uZXIifSwidCI6InRzcCJ9
 is verified and added to the database bob
We need to configure the association between alice and bob's inner VIDs.
Use the set-relation command to specify which VID should be used to send messages
a certain VID:
tsp -d alice set-relation bob-inner alice-inner
Then set the parent/child relationship of bob's VIDs in alice's database:
tsp -d alice set-parent bob-inner bob
Now we are ready to send a nested message. First start listening for messages from bob's side:
tsp -d bob receive --one bob
Then send a nested message from alice:
echo "Hi Bob!" | tsp --pretty-print -d alice send -s alice-inner -r bob-inner
Output:
 INFO tsp::async_store: sending message to https://tsp-test.org/user/bob
CESR-encoded message:
-EABXAAA9VIDAAALAAAZGlkOndlYjp0c3AtdGVzdC5vcmc6dXNlcjphbGljZQ8VIDAAAKAAZGlkOnd
lYjp0c3AtdGVzdC5vcmc6dXNlcjpib2I4CC2TF93f5Igkjgp4feBYOas18w-GhN_Q7oCRNStEbbdVK
aN7Uqr2DK3-A3xf7b9px6KchftsEsIx7AM2fVO1V4KJ8OixmVPoPK59q9TpoioCiL2XmmZLT3Gj4X0
MIbYCIyJWSBQNwVyH3h434Ja86xSx8rR87H48sX9MtKSgRwkP_iU4FiJOzg27vIUVtzLZacp2Bwvti
p_WATvkQm4uecQwb-0dCpC8x_TjDyyARLglahjQrz2DPImn-_UzJKZqv1kqLKTED0dD-7WqOtY-1Ll
gasteOVKQlH6DtcvNPqUCWnZJtT0vJvpVpogeQ_5Ky_WdPRflUOyic4lE93lbDgPWxGdZ5Qnu8lTG3
XntZMCLh95r89hr6oTMJwQoWdlS0NEH-UEQt2NLxeYwXH_rG0uoZW2k4YC1PvmJ5zdAhW721IkSuKg
y0STK0eDk4q0EZagBn4iFUnye1m34TZb5F7hmzVmNolhgojXmPmT9PdC8a90Z6c-AS9xYHVZHkUjF2
gYPuYHu6RdKJ8fT2OZJ_hbfBXeYHA6-hloFBHqLMShCGFZKrY6uw6dWZ6DB96WRa0ubakV3fDDNyLu
Rol52q133vSkgspyN7hYEtUEojnOyrOVsX8yrVoONHxCZ-3g1oe6LJNnLC8CxmF2n1-WQgvaQBwj3Q
a8EQDX0n2VWnhG0xWZeclCG54qJSC6YEiNS1XGfe6m2ZFEWqmLZDmr1PbxhO4m0BA9BEqEHLumN0cx
ip0iXo-yHjrA5EP_ka8Y4pkQdTpr5yJZJqHjyThVwgvbbQX9ORRND-qV6Tl0MRcJ8lTWAhbDw
 INFO tsp: sent message (8 bytes) from did:peer:2.Vz6MutdCU73wbCRc4Uypzg1a3gU5
 vAfwsLjHWbgArHzjqWzpw.Ez6LbwxU56UYuE9EwTPgVJFX2nB3UcssbLk7nnrEF8qQNEZQv.SeyJz
 Ijp7InVyaSI6Imh0dHBzOi8vdHNwLXRlc3Qub3JnL3VzZXIvYWxpY2UtaW5uZXIifSwidCI6InRzc
 CJ9 to did:peer:2.Vz6Mv49Sf4ui8iG5C7VTjMS2bXq7EZDhyKSDNbcQhcvUmGLLW.Ez6Lc2Ryw
 Grd9ARMmfLBGL3QFsoijt1PmYMMFrPRk6QMfwTEr.SeyJzIjp7InVyaSI6Imh0dHBzOi8vdHNwLXR
 lc3Qub3JnL3VzZXIvYm9iLWlubmVyIn0sInQiOiJ0c3AifQ
The output on bob's end:
 INFO tsp: listening for messages...
 INFO tsp: received message (8 bytes) from did:peer:2.Vz6MutdCU73wbCRc4Uypzg1a3
 gU5vAfwsLjHWbgArHzjqWzpw.Ez6LbwxU56UYuE9EwTPgVJFX2nB3UcssbLk7nnrEF8qQNEZQv.Sey
 JzIjp7InVyaSI6Imh0dHBzOi8vdHNwLXRlc3Qub3JnL3VzZXIvYWxpY2UtaW5uZXIifSwidCI6InRz
 cCJ9
Hi Bob!
Routed mode
Like nested mode, routed mode can be set up by exchanging relationship messages between every hop in the node (for the most
part), or more manually. In this document we will assume a setup with four nodes: a sender a, receiver b, and two intermediaries p and q.
Routed mode (semi-automated set up)
To set up routed mode, the four nodes need to establish bidirectional outer relationships with each other using tsp request and
tsp accept, as shown in the chapter on nested mode. We will not repeat instructions on how to do that here and assume that all the one-to-one relationships have already
been formed.
What is special about routed mode, is that the final hop node q, needs to have a special VID (say q2) that is dedicated to sending
messages to the final recipient b. This can be achieve in two ways:
-
Establishing a nested relationship between
qandb, and then using the inner VID forqas the final hop. Nested relationships always have a "relation vid". -
Explicitly creating a separate public identity for the node
qthat is verified byband hasbas its "relation vid":> tsp -d q create --alias q2 q2 > tsp -d q set-relation q2 b
When this set up is done, all these is needed to send a routed message from a to b is to set up a route.
tsp -d a set-route b VID-FOR-P,VID-FOR-Q,VID-FOR-Q2
Note, this requires a to have verified the VID of p, but it does not need to have verified the VID's q or q2. In fact, if
the VID q2 is an inner vid for a nested relationship, a will not have a way to verify it at all.
When this route is set up properly, sending a message proceeds as normal:
echo "Routed Hello" | tsp -d a send --sender-vid a --receiver-vid b
Routed mode (manual set up)
Routed mode is a bit more involved than direct or nested mode. We need to setup correctly configured intermediary servers.
In this example we use preconfigured identities and intermediaries from tsp-test.org instead of using the
TSP CLI itself for the intermediaries.
We will use intermediaries p and q to send a message from a to b.
The key material for these can be found in the Rust TSP repository.
Overview:
┌────────────────┐   ┌────────────────┐
│                │   │                │
│ Intermediary P ├──►│ Intermediary Q │
│                │   │                │
└────────────────┘   └────────┬───────┘
        ▲                     │
        │                     ▼
┌───────┴────────┐   ┌────────────────┐
│                │   │                │
│ A (sender)     │   │ B (receiver)   │
│                │   │                │
└────────────────┘   └────────────────┘
Download key material for a and b:
curl -s https://raw.githubusercontent.com/openwallet-foundation-labs/tsp/main/examples/test/a.json > identity-a.json
curl -s https://raw.githubusercontent.com/openwallet-foundation-labs/tsp/main/examples/test/b.json > identity-b.json
Configuration
Create a new identity (and database) for a based on the downloaded file using the
create-from-file command:
tsp -d a.json create-from-file --alias a ./identity-a.json
We also initialize b:
tsp -d b.json create-from-file --alias b ./identity-b.json
Resolve and verify the VID for a in the database for b:
tsp -d a.json print a | xargs tsp -d b.json verify --alias a
Resolve and verify the VID for b in the database for a,
and verify the VIDs for the intermediary servers p and q:
tsp -d b.json print b | xargs tsp -d a.json verify --alias b
tsp -d b.json verify did:web:did.tsp-test.org:user:q --alias q
Verify the VIDs for the intermediaries and the endpoint.
Passing the --sender argument configures which sender VID is used when sending
messages to the passed VID. This is equivalent with an extra call to the set-relation
command.
tsp -d a.json verify did:web:did.tsp-test.org:user:p --alias p --sender a
tsp -d a.json verify did:web:did.tsp-test.org:user:b --alias b --sender a
tsp -d a.json verify did:web:did.tsp-test.org:user:q --alias q
tsp -d a.json set-route b p,q,q
The set-route command configures the route for the VID aliased by b.
Note that the last hop in the route, q, in practice should be VID that the intermediary
only uses to communicate with the receiver (b). For the sake of simplicity
we configured the intermediary q with a VID that is also configured as the
sender VID when communication with the VID of b.
Send a message
Sending the routed message is trivial, now we have configured the relations and route.
Let b listen for one message:
tsp -d b.json receive --one b
Let a sent a message:
echo "Hi b" | tsp --pretty-print -d a.json send -s a -r b
Output:
 INFO tsp::async_store: sending message to https://p.tsp-test.org/transport/p
CESR-encoded message:
-EABXAAA9VIDAAALAAAZGlkOndlYjpkaWQudHNwLXRlc3Qub3JnOnVzZXI6YQ9VIDAAALAAAZGlkOn
dlYjpkaWQudHNwLXRlc3Qub3JnOnVzZXI6cA4CB2WE2d08bhGjkJJUg3la1JbsK7apfaOSxH-otajv
YveQ093-rTQWvq3kUJokCH7dT_5gbIzJdDsLxTYDu6dz4IyJhGg6JzCpqrerG5GwMaoICtJGn9wPGN
WjJHuSzBoqdKY3OQpsGolHh03aenVrREZ0aqjn_z3cczWxBRhUiUCjtlTmbEZEMmCdqSdB50erIZd3
Vj0-mCA0-PKSa_Ij-IsX9S1HbXtitZftxIRpSqnuEOS0doudXWWKNhehLWteUTDPnjn11JpVJmfKEE
jvY1-qx5gmUmpG3zAS054q0YSIJWFB9t22LWp80n7HXjEKnm8WcQF4O9GmRWmYe_LR46-2JC_u9Yux
UXnZVrnUiGAq-xK331yfRd0X58M0B2d4qRrZMjfFvBFt5CGbp3WvYvynNLOM6NA3wp2j2Dy6B1FIBs
2rAnMfYR2wzSmwYQcbGOvRok4pdg9rI1EGPPgUKcRuoB0BA4XLvi8Yw-webwWRLW0GA7jNTfNSdmAm
sd_mGJp4hkMz_P9-R04we14TOl-v8dvCuOjcp_UIDrB-vjeAwqzyNBw
 INFO tsp: sent message (5 bytes) from did:web:did.tsp-test.org:user:a
 to did:web:did.tsp-test.org:user:b
Note that the message is longer than a direct mode message, since the ciphertext contains another TSP message.
Debug intermediaries
The example intermediary servers p and q maintain a brief log of recent messages,
see https://p.tsp-test.org/ and https://q.tsp-test.org/
after sending a routed message.